

Watch a patient lift an arm and you see degrees on a goniometer. Watch a good therapist treat a stiff shoulder and you see almost nothing: two hands, a few millimetres of movement, a calm face. The gap between what you can see and what is happening inside the joint is the whole subject of joint mobilization.
What actually moves when a therapist applies joint mobilization?
Joint mobilization is a passive manual technique in which a therapist moves one joint surface on the other using graded, controlled oscillations or stretches that the patient can stop at any time. The aim is to reduce pain or restore accessory movement, so the joint can move through its full available range.
"Passive" means the patient does no work. Mobilization, manipulation, traction and passive range-of-motion work all sit in that family: the force comes from the therapist's hands or from a machine.
I spent most of my second year believing that Maitland grade III and Kaltenborn grade III described the same stretch with different spellings, until a practical examiner corrected me in about ten seconds. This article is built to spare you that moment. You get one working model built on movement, resistance, direction and dose, so you can rebuild any technique in the exam hall instead of memorizing it.
Start with the two kinds of movement a joint has. Physiological movements are the ones you can name and measure: flexion, abduction, rotation, a bone swinging through an arc. Accessory movements (joint play) are the tiny slides, spins and separations between the surfaces, which nobody can produce voluntarily. A sticky kitchen drawer makes the point. You can pull the handle as hard as you like, but if the runners won't slide, the drawer stays shut. A stiff joint is that drawer: lost slide, blocked arc.
You're probably thinking that a stiff joint means a bone has slipped out of place. Almost never. The surfaces sit exactly where they should; what has gone is a few millimetres of glide, because the capsule or ligaments have tightened or pain is guarding the joint.
So why would moving it passively help? The Kisner, Colby and Borstad text lays out two routes. The mechanical route stretches a tight capsule and ligaments. The neurophysiological route works through gentle oscillation, which stimulates joint mechanoreceptors whose signals compete with pain input at the spinal level. Small oscillations lean on the nervous system; sustained stretches lean on the tissue. Keep that split in mind, because it decides the grades later. How much each route contributes in a real patient is still debated, so describe both as proposed mechanisms in an exam.
Both routes need a direction to push, and one rule supplies it.
Convex-concave rule: where your hand should push
Every joint movement is a blend of three arthrokinematic motions. Roll brings new points on one surface into contact with new points on the other, like a tyre on a road. Glide (also called slide) keeps one point on a surface meeting new points on its partner, like a locked wheel skidding on ice, and it is the motion your hands can add. Spin turns a surface about a fixed axis; the radial head rotating against the capitellum in forearm rotation is the classic case.
Now the rule. Neumann's kinesiology text sets it out cleanly: when a convex surface moves on a fixed concave one, roll and glide travel in opposite directions. When a concave surface moves on a fixed convex one, they travel the same way.
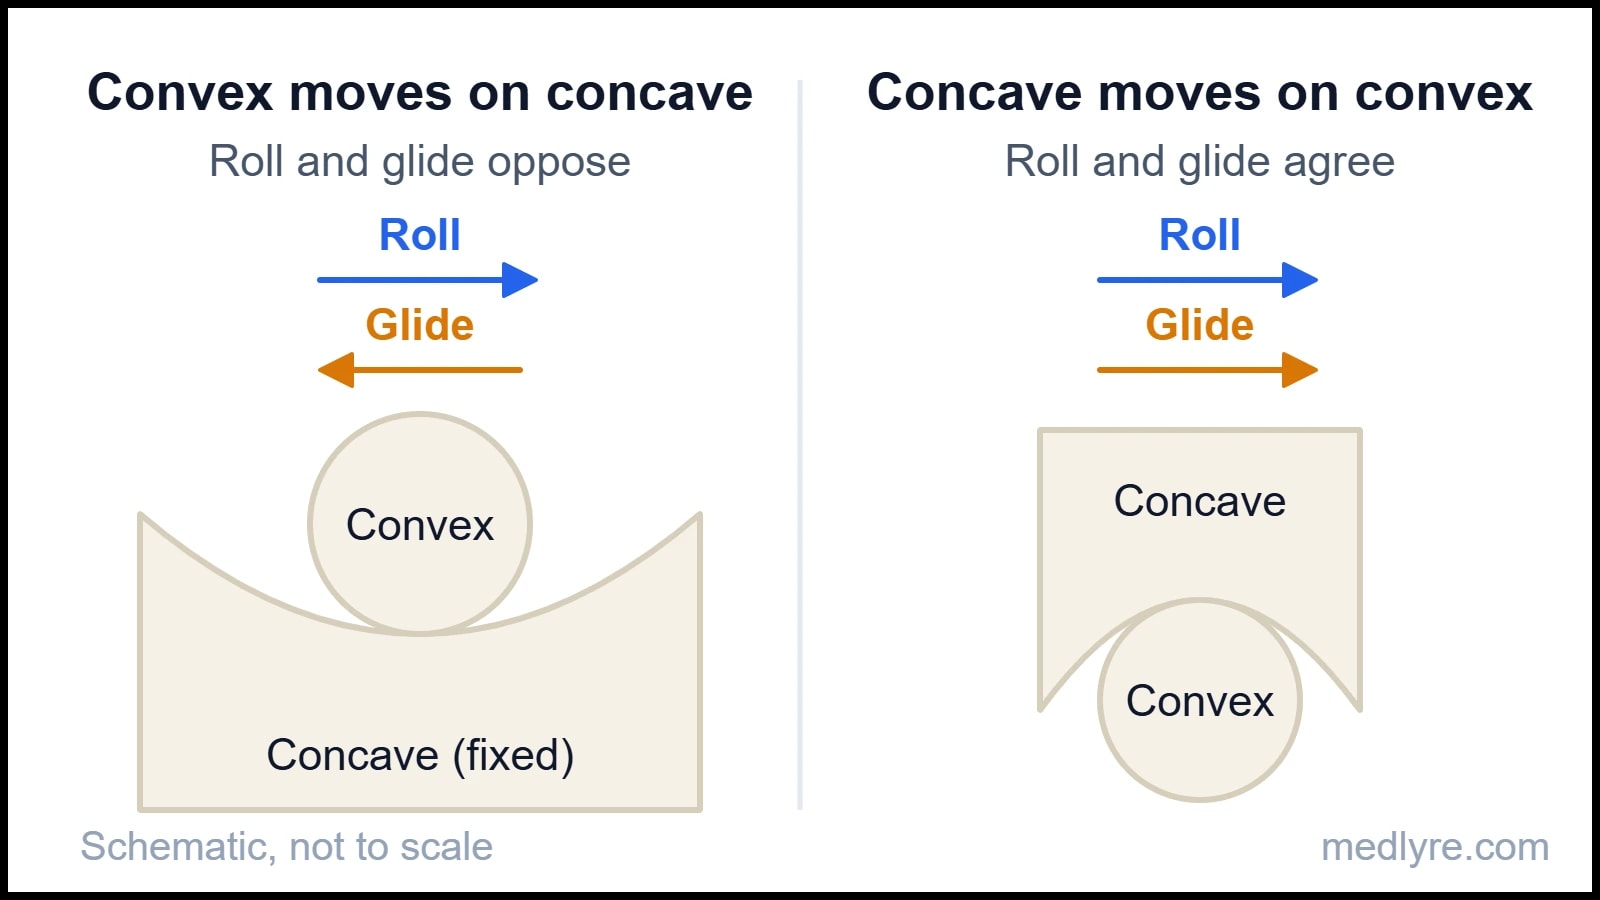
Read the figure with a shoulder in mind. As you abduct the arm, the convex humeral head rolls upward on the concave glenoid, so it has to glide downward or it would ride up into the acromion. A therapist chasing lost abduction therefore glides the head inferiorly.
Strip the rule out and see what gives way. Glide the head upward in a patient whose abduction is stuck and you add to a roll the joint already has, pinching soft tissue under the acromial arch. You would likely add pain and gain little range.
The knee is the exam favourite because it flips the rule. In open-chain extension, the concave tibial plateau moves on the fixed convex femoral condyles, so roll and glide share a direction: both anterior. In a closed-chain rise from a squat, the convex femur moves on the fixed tibia, so it rolls forward while gliding backward. Same joint, two rules, and the only thing that changed was which bone is moving. Sit with that for a second.
Direction also needs a reference plane. Kaltenborn's treatment plane touches the concave surface at right angles to a line drawn from the centre of the convex bone to the concave surface. Traction goes at right angles to the plane, pulling the surfaces apart. Glides run parallel to it. Stabilize one bone, move the other, and keep your hands close to the joint line.
Begin each technique in the joint's resting position (loose-packed), where the capsule is slackest and the surfaces least congruent, so the joint offers the most play. The close-packed position is the opposite: surfaces fully congruent, ligaments taut, almost no glide left to mobilize. These resting positions appear in most exercise-therapy texts and are worth learning cold:
| Joint | Resting (loose-packed) position |
|---|---|
| Glenohumeral | 55° abduction, 30° horizontal adduction |
| Humeroulnar (elbow) | 70° flexion, 10° supination |
| Hip | 30° flexion, 30° abduction, slight external rotation |
| Knee | 25° flexion |
| Talocrural (ankle) | 10° plantarflexion, midway between inversion and eversion |
You now know which way to push. How hard, and how far into the range, is where students lose marks.
Why do Maitland and Kaltenborn grades not line up?
Textbooks print the two grading systems side by side as if they answered one question. Each answers a different one.
Maitland's five grades ask: where in the available range am I working, and how big are my oscillations? The reference points are R1, the first onset of resistance, and R2, the limit of the available range in that patient. Grades I and II sit in free range. Grade I is a small-amplitude oscillation at the start of the range; grade II is large-amplitude but stays clear of R1. Grade III is large-amplitude and drives into resistance up to R2. Grade IV is small-amplitude right at that limit. Grade V is a small-amplitude, high-velocity thrust at the end of range, which belongs to manipulation, covered below. Hengeveld and Banks, in their edition of Maitland's peripheral manual, tie the grade chosen to how irritable the joint is: pain that appears before resistance points to the lower grades, and stiffness that stops you first points to III and IV.
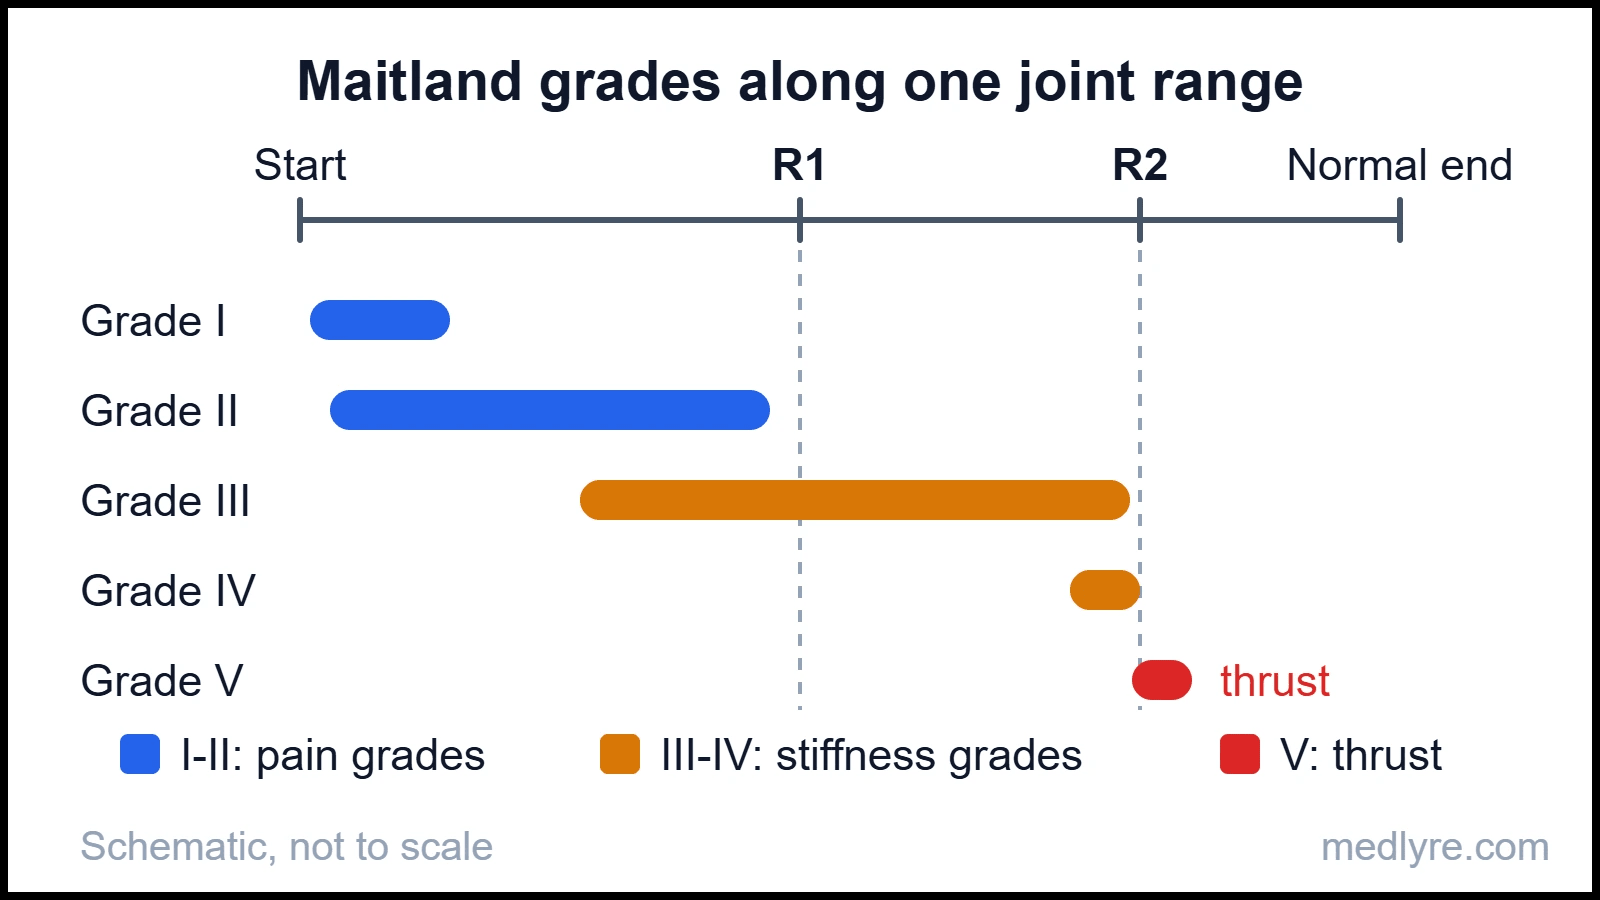
Honestly, the usual textbook picture of the grades, five overlapping arcs on one curve, makes this look harder than it is. Read the figure left to right instead. Pain grades live before R1. Stiffness grades live at and around R2. Notice that R2 sits short of the normal end, because this joint is stiff.
Now the Norwegian system. Kaltenborn's three grades ask a different question: how much stress is the tissue under? Think of a tow rope. Grade I (loosen) takes the pressure off the joint surfaces without tightening anything: the rope hangs slack. Grade II (tighten) takes up the slack until the rope just goes taut. Grade III (stretch) pulls on the taut rope and puts real stretch through capsule and ligaments. His manual applies these to traction and glides alike, with pain relief at grades I and II and grade III kept for a restricted joint.
Maitland tells you where in the range to work; Kaltenborn tells you how much stress the tissue receives.
| Feature | Maitland | Kaltenborn |
|---|---|---|
| Number of grades | 5 (I to V) | 3 (I to III) |
| Question answered | Where in the range, and how big the amplitude | How much stress on the tissue |
| Pain | Grades I and II, before R1 | Grades I and II (loosen, tighten) |
| Stiffness | Grades III and IV, into resistance | Grade III (stretch) |
| Thrust | Grade V | Treated separately as manipulation |
| Typical movement | Rhythmic oscillation | Often a sustained stretch |
Where students slip
Writing "grade IV = thrust" for either system. In Maitland's scheme, III and IV are still oscillations; the only thrust is grade V. Kaltenborn grade III is a sustained stretch, not a Maitland-style oscillation. Label the system before you write the grade.
A flow of reasoning helps when you choose a starting grade:
flowchart TD
    A["Assess the joint at its first limit"] --> B{"What stops movement first?"}
    B -->|"Pain, before R1"| C["Pain-dominant picture"]
    B -->|"Stiffness, at R2"| D["Stiffness-dominant picture"]
    C --> E["Grades I-II: oscillations in free range"]
    D --> F["Grades III-IV: oscillations into resistance"]
    E --> G["Reassess movement, pain and resistance"]
    F --> G
    G -->|"Re-grade"| B
Figure 3: A starting rule for choosing the grade, with reassessment feeding back into the choice.
The commonly quoted rhythm for the pain grades is about 2 to 3 oscillations per second for roughly a minute, with stiffness grades slower and held longer. Dosage tables differ between editions, so use the numbers your own syllabus gives you. Real joints are rarely pure pain or pure stiffness, so treat the flowchart as a starting rule and let the reassessment loop do the rest.
Know the stop signs too. Textbooks list fracture, malignancy, infection, acute inflammatory arthritis, severe osteoporosis and neurological deficit such as cauda equina signs as reasons not to mobilize the affected region. A hypermobile or unstable joint needs stability work rather than more glide, and anticoagulant use or a recent surgical repair calls for extra caution. Your own syllabus will fix the exact lists; the logic is always the same: never add movement to a joint that already has too much, or to tissue that cannot take the force.
Everything so far stays inside what the patient can stop. The next technique takes that control away.
Manipulation is a different animal
Mobilization keeps the patient in control. Manipulation is a high-velocity, low-amplitude (HVLA) thrust delivered at or beyond the end of available range, too fast for the patient to resist. This is Maitland's grade V and the technique osteopaths and chiropractors are best known for. StatPearls treats HVLA as interchangeable with the words "thrust" and "manipulation" and describes the audible pop as cavitation, a gas bubble forming or collapsing in the synovial fluid, after which the joint needs about 15 minutes before it can pop again.
That raises the question every student asks. Does the pop prove the joint clicked back into place? Evidence summarized in that same chapter finds no relationship between hearing a pop and improvement in pain, range of motion or impairment in non-radicular low back pain. The sound is a by-product of gas dynamics.
Risk is the reason this technique gets its own screening. Reported adverse events after cervical manipulation are rare, in the region of 1 in 400,000 to 1,000,000 according to a figure quoted in the entry above, but the possible consequences, such as vascular injury to the neck, are serious. The 2023 IFOMPT cervical framework (Rushton and colleagues) asks therapists to examine for vascular pathology risk and other red flags before any cervical manual intervention. That is why many programmes teach grade V as theory first and as supervised practice later.
Pulling a joint apart: how traction works and when it fails
Traction applies a longitudinal pulling force that separates joint surfaces or lengthens soft tissue. On a peripheral joint it is called distraction and sits at the heart of Kaltenborn's technique. On the spine, it is applied manually or by machine and is one of the most examined passive techniques.
| Type | How the force is applied |
|---|---|
| Manual | Therapist's hands, force graded by feel and used in short bouts |
| Mechanical | Motorized or weight-based unit with a harness, run as sustained or intermittent |
| Positional | Gravity and body position, with no external pull |
| Self-traction | Patient applies force with own body weight or a home device |
Sustained traction holds one force for minutes; intermittent traction cycles hold and release over seconds. Textbooks typically allow roughly 10 to 30 minutes per session depending on the source.
The proposed effects are separation of joint surfaces, widening of the intervertebral foramina, stretch of soft tissue and muscle relaxation. The force needed is the part students get wrong. Kisner and colleagues cite roughly a quarter of body weight just to overcome friction between the lower body and the table in lumbar traction, and in the region of half body weight before measurable vertebral separation. Exact figures shift between editions, so check yours. Cervical forces are far lower, and the head is usually held in roughly 20 to 30° of flexion.
Take away the friction allowance and the numbers collapse. Set a lumbar unit to a tenth of body weight and the table, not the spine, absorbs the pull. That's why many units use split tables, which cut the friction on the lower half.
Here the evidence gets honest, and so should you. The Cochrane review of traction for low back pain with or without sciatica, led by Wegner, found little or no benefit on pain, function or return to work. Clinical teaching still describes plausible mechanisms. I'd rather you walk into the viva able to state both than defend traction as proven.
Why contraindications are an exam favourite
Examiners like to ask when traction must not be used. Textbook lists include:
- Malignancy, infection or active inflammatory disease in the region
- Fracture, or severe osteoporosis, where the force can exceed what the bone tolerates
- Spinal cord compromise or instability, including rheumatoid involvement of the upper cervical spine
- Vertebrobasilar insufficiency, for cervical traction
- Pregnancy, for lumbar traction
Ninety seconds before the viva
Hold this in your head
- Joint mobilization is passive, graded and stoppable by the patient. Physiological movement is what you see. Accessory movement (joint play) is what you add.
- Convex on concave: roll and glide oppose. Concave on convex: they agree.
- Start in the resting position. The treatment plane lies across the concave surface; traction is perpendicular to it, glides parallel.
- Maitland: I-II pain, III-IV stiffness, V thrust. R1 is first resistance, R2 is the limit.
- Kaltenborn: I loosen, II tighten, III stretch.
- Manipulation is an HVLA thrust at end range. The pop does not prove realignment, and screening comes first.
- Traction has to beat friction before it separates anything. Mechanisms are taught; trial evidence is mixed.
The doubts that keep coming back
Q. Is joint mobilization the same as stretching a muscle?
Muscle stretching lengthens a contractile unit by moving a bone through its arc. Mobilization works on capsule, ligaments and joint surfaces by adding accessory glides or distraction. A tight capsule can limit range even when the muscles are long, which is why stretching the muscles around a frozen shoulder leaves most of the restriction untouched. Different tissue, different technique.
Q. Which grade goes with pain and which with stiffness?
In Maitland's system, grades I and II are the pain grades, worked in free range before R1. Grades III and IV are the stiffness grades, worked into resistance up to R2, and grade V is the thrust. In Kaltenborn's system, grades I and II (loosen, tighten) suit pain relief and grade III (stretch) suits a restricted joint. Reassess after each bout and re-grade.
Q. Does the pop mean the joint went back into place?
No evidence says so. The pop comes from gas bubble formation in synovial fluid (cavitation), and that same chapter notes no link between hearing it and improvement in non-radicular low back pain. A joint also needs roughly 15 minutes before it can pop again. Treat the sound as a by-product.
Q. Why mobilize in the resting position?
The capsule is slackest there and the surfaces are least congruent, so the joint offers the most play to work with. In a painful joint it is often also the position of least discomfort, which makes grade I and II techniques tolerable. The close-packed position does the opposite: surfaces congruent, ligaments taut, almost no glide left.
Q. Does the research support spinal traction?
The picture is mixed. Textbooks teach clear mechanisms, such as separation of surfaces and muscle relaxation, but the Cochrane review of low back pain traction found little or no benefit on pain or function. Evidence for other regions and for particular subgroups is thinner still. For an exam, state the mechanism and the evidence caveat together, and avoid claiming that traction cures disc problems.
Q. Is Mulligan's mobilization with movement a passive technique?
Partly. The therapist applies a sustained accessory glide (passive) while the patient actively performs the painful movement, so it mixes both. Syllabi usually teach it as its own concept, separate from the Maitland and Kaltenborn systems. The glide direction is still chosen with the same kind of arthrokinematic reasoning.
For students, not patients
Everything in this article exists to help students understand a topic they struggle with. It is not a treatment guide, not a clinical protocol, and not a substitute for the curriculum your institution follows. Bedside decisions always need qualified supervision and full patient assessment.
References
- Kisner C, Colby LA, Borstad J. Therapeutic Exercise: Foundations and Techniques. 7th ed. F.A. Davis; 2018.
- Kaltenborn FM. Manual Mobilization of the Joints, Volume I: The Extremities. 6th ed. Norli; 2002.
- Hengeveld E, Banks K, eds. Maitland's Peripheral Manipulation: Management of Neuromusculoskeletal Disorders, Volume 2. 5th ed. Churchill Livingstone; 2014.
- Neumann DA. Kinesiology of the Musculoskeletal System: Foundations for Rehabilitation. 3rd ed. Elsevier; 2017.
- StatPearls Publishing. "High-Velocity Low-Amplitude Manipulation Techniques." StatPearls [Internet]. Updated 2023 Jun 4. NCBI Bookshelf.
- Wegner I, Widyahening IS, van Tulder MW, et al. "Traction for low-back pain with or without sciatica." Cochrane Database Syst Rev. 2013.
- Rushton A, Carlesso LC, Flynn T, et al. "International Framework for Examination of the Cervical Region for Potential of Vascular Pathologies of the Neck Prior to Musculoskeletal Intervention: International IFOMPT Cervical Framework." J Orthop Sports Phys Ther. 2023;53(1).